ENVI ® Py for ArcGIS ®
ENVI Py for ArcGIS provides a Python client library named envipyarc to run ENVI analytics through ArcMap™ and ArcGIS Pro.
System Requirements
- ENVI 5.3 Service Pack 2 or later
- ArcMap 10.4 or later and/or ArcGIS Pro 1.3 or later
To use ENVI for ArcGIS full interoperability, ENVI 5.4 is required.
Installation and Configuration
ArcMap
Start a Windows command prompt in administrator mode.
Issue the following commands:
$ cd c:\Python27\ArcGIS10.5\Scripts
$ pip install envipyarc
Close the windows command prompt.
Start ArcMap.
In the Catalog window, select Toolboxes > System Toolboxes > ENVI Management Tools.pyt > Configure ENVI Environment. If this file does not appear in System Toolboxes, connect to the folder located at C:\Python27\ArcGIS10.x\Lib\site-packages\envipyarc\esri\toolboxes\ and run it from there.
Double-click Configure ENVI Environment.
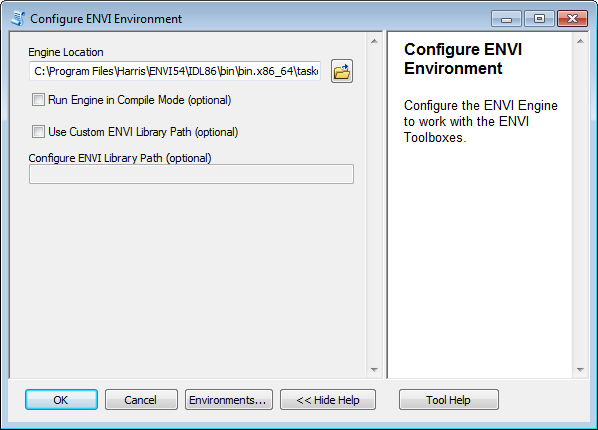
- In the required Engine Location field, enter the full path of the ‘taskengine.exe’ in your ENVI distribution. The default path is <ENVI_INSTALL_DIR>\IDLXX\bin\bin.x86_64\taskengine.exe
- Enable the Run Engine in Compile Mode option if you want to compile .pro files. This depends on what your ENVI license allows. If you disable this option, the ENVI code you want to run must be packaged as IDL SAVE files (.sav).
- Enable the Use Custom ENVI Library Path option to specify one or more directories that contain custom ENVI code. Then enter the path to the directories in the Configure ENVI Library Path field. Use a semicolon to separate individual directory paths.
- Click OK to run the tool and save the environment.
ArcGIS Pro
From the Windows start menu, select ArcGIS > ArcGIS Pro > Python Command Prompt. Be sure to run this as an administrator.
Issue following command:
$ pip install envipyarc
Close the Python Command Prompt.
Start ArcGIS Pro.
Click Select another project template.
Select New > Computer and click the Browse button.
Navigate to C:\Program Files\ArcGIS\Pro\bin\Python\envs\arcgispro-py3\lib\site-packages\envipyarc\esri\projecttemplates\.
Select ENVIPyManagement.aptx.
Enter a name for your project and click OK.
In the Project pane, select Toolboxes > ENVI Management Tools.pyt.
Expand the ENVI Management Tools toolbox, and double-click the Configure ENVI Environment tool.
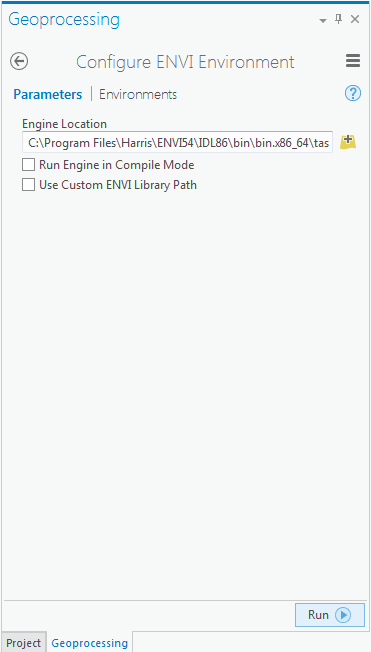
- In the required Engine Location field, enter the full path of the ‘taskengine.exe’ in your ENVI distribution. The default path is <ENVI_INSTALL_DIR>\IDLXX\bin\bin.x86_64\taskengine.exe.
- Enable the Run Engine in Compile Mode option if you want to compile .pro files. This depends on what your ENVI license allows. If you disable this option, the ENVI code you want to run must be packaged as IDL SAVE files (.sav).
- Enable the Use Custom ENVI Library Path option to specify one or more directories that contain custom ENVI code. Then enter the path to the directories in the Configure ENVI Library Path field. Use a semicolon to separate individual directory paths.
- Click OK to run the tool and save the environment.
Usage
ENVI Py for ArcGIS lets you generate an ArcGIS Python Toolbox that contains geoprocessing tools (GPTools). These tools are associated with tasks provided by ENVI. You can create an ArcGIS Python Toolbox in the following ways:
- An ENVI Management Tools toolbox provided as a system toolbox for ArcMap.
- An ENVI Py Management project template containing the ENVI Management Tools toolbox for ArcGIS Pro.
- A command-line tool, named createenvitoolbox, provided in the Python scripts directory.
- A Python package named envipyarc.
The options are described next.
Create ENVI Toolbox
ArcMap
- Start ArcMap.
- In the Catalog window, select Toolboxes > System Toolboxes > ENVI Management Tools.pyt > Create ENVI Toolbox.
- Double-click Create ENVI Toolbox.
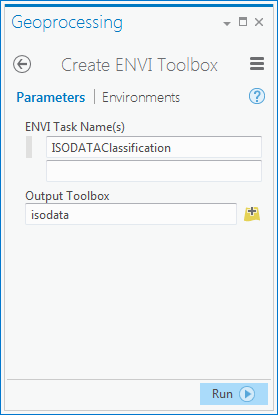
- In the required ENVI Task Name(s) field, enter one or more ENVI tasks to be wrapped into a GPTool.
- Click the + button to add the tasks to the Task list.
- In the required Output Toolbox field, specify a location to create the toolbox.
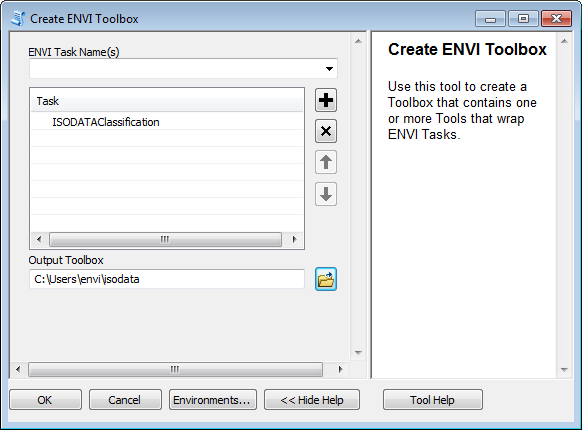
- Click OK. After the toolbox is created, navigate to the location specified in Output Toolbox.
- Double-click ISODATAClassification. The ISODATA Classification tool appears.
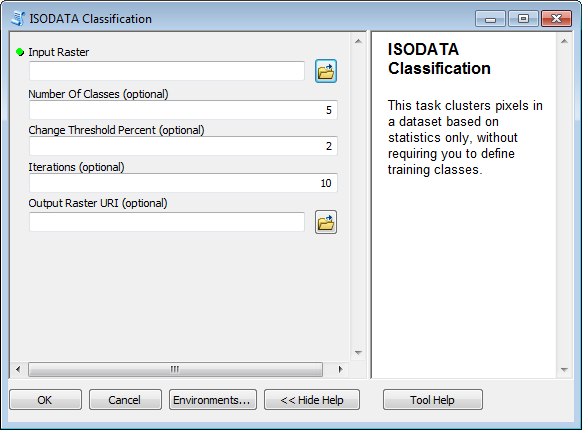
- In the required Input Raster field, select an input raster dataset.
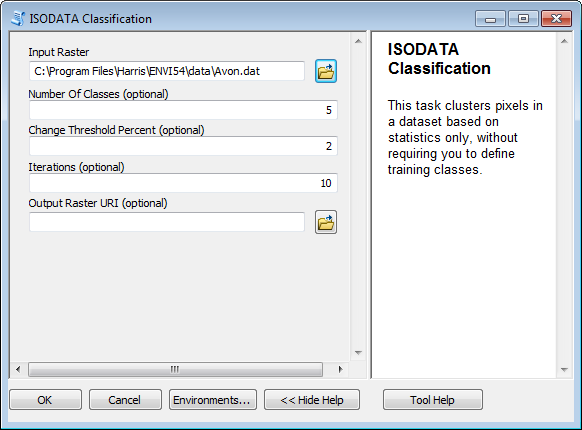
- Click OK. When processing is complete, the result will display in ArcMap.
ArcGIS Pro
- Start ArcGIS Pro.
- Open the project you created earlier in the Installation section.
- In the Project pane, select Toolboxes > ENVI Management Tools.pyt > Create ENVI Toolbox.
- Double-click Create ENVI Toolbox.
- In the required ENVI Task Name(s) field, enter one or more ENVI tasks to be wrapped into a GPTool.
- Click the + button to add the tasks to the Task list.
- In the required Output Toolbox field, specify a location to create the toolbox.
- Click Run. When processing is complete, use the Project tab to navigate to the Output Toolbox field.
- Double-click ISODATAClassification. The ISODATA Classification tool appears.
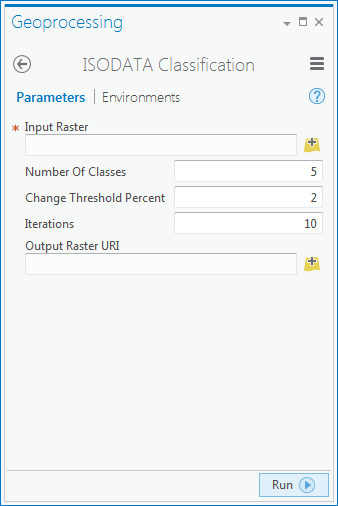
- In the required Input Raster field, select an input raster dataset.
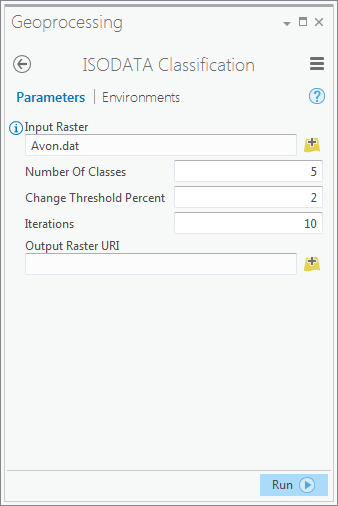
- Click Run. When processing is complete, the result will display in ArcGIS Pro.
Command Line
The envipyarc package contains a command-line tool named createenvitoolbox.py. This tool can create a Python toolbox that wraps ENVI tasks. The location of this file differs by product:
- ArcMap: C:\Python27\ArcGIS10.x\scripts
- ArcGIS Pro: C:\Program Files\ArcGIS\Pro\bin\Python\envs\arcgispro-py3\Scripts
To run the script, go to the Windows Start menu and select ArcGIS > Python Command Prompt.
To display the help, navigate to the scripts directory and run the –help option:
$ python createenvitoolbox.py --help
To create a Python toolbox with the ENVI Tasks SpectralIndex and ISODATAClassification, run the following command:
$ python createenvitoolbox.py SpectralIndex ISODATAClassification --output C:\\ENVITasks.pyt
The toolbox name is the same as the engine name if no option is provided. The output directory defaults to the current directory if no option is provided.
Python
Use the create_toolbox member method to create a toolbox from a Python module:
>>> from envipyengine import Engine
>>> engine = Engine('ENVI')
Construct a list of tasks to add to the toolbox:
>>> task_list = [engine.task('SpectralIndex'), engine.task('ISODATAClassification')]
Instantiate a GPToolbox class for creating a toolbox:
>>> from envipyarc import GPToolbox
>>> envi_toolbox = GPToolbox(task_list)
>>> toolbox_file = envi_toolbox.create_toolbox('c:\\my_envi_tools')
The create_toolbox method returns the filename of the toolbox, which can then be used by arcpy to import the toolbox:
>>> import arcpy
>>> arcpy.ImportToolbox(toolbox_file)
Run the toolbox:
>>> input_raster = 'C:/Program Files/Harris/ENVI54/data/qb_boulder_msi'
>>> index = 'Normalized Difference Vegetation Index'
>>> result = arcpy.SpectralIndex_envi(input_raster,index)
>>> print(result)